Are you building a Flutterflow app and want to keep your users engaged with real-time updates? Push notifications are a great way to do just that. In this blog, we'll walk you through the steps of implementing push notifications in your Flutterflow app.
What are push notifications?
Push notifications are messages that are sent directly to a user's device. They can be used to alert users of new content, remind them of upcoming events, or prompt them to take action. Push notifications are a powerful tool for engaging users and keeping them coming back to your app.
How to add push notifications in your Flutterflow app
Step 1: Create a Firebase project
To implement push notifications, you'll need to create a Firebase project. Firebase is a mobile and web application development platform that provides a suite of services to help you build and grow your app. Follow these steps to create a Firebase project:
1. Go to the Firebase Console and sign in with your Google account.
2. Click "Add project" and give your project a name.
3.Follow the on-screen instructions to set up your project.
Step 2: Set up Firebase Cloud Messaging (FCM)
Firebase Cloud Messaging (FCM) is a service that allows you to send push notifications to your users' devices. Follow these steps to set up FCM:
- In your Firebase project, go to the Cloud Messaging section.
- Follow the on-screen instructions to add a new app and register it with FCM.
- Download the ‘google-services.json’ file and add it to your Flutter project.
Step 3: Add the FlutterFire plugin
FlutterFire is a set of Flutter plugins that provides easy access to Firebase services. To use Firebase Cloud Messaging in your Flutter app, you'll need to add the FlutterFire messaging plugin to your project. Follow these steps:
- Add the ‘firebase_messaging’ dependency to your ‘pubspec.yaml’ file.
- Run ‘flutter pub get’ to install the package.
- Add the ‘firebase_messaging’ import statement to your Dart code.
Step 4: Request permission for notifications
Before your app can receive push notifications, you need to request permission from the user. Follow these steps to do so:
1. Add the following code to your app's main file:
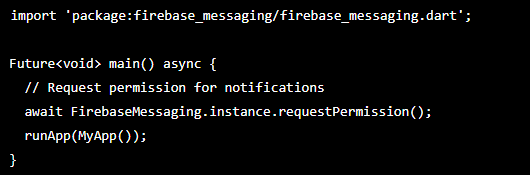
This code requests permission from the user and then runs your app.
Step 5: Handle incoming notifications
Finally, you need to handle incoming notifications in your app. Follow these steps to do so:
1. Add the following code to your app's main file:

2. This code listens for incoming notifications and handles them when the app is in the foreground or opened from a notification.
Conclusion
Adding push notifications to your Flutterflow app is a great way to keep your users engaged and coming back for more. By following these steps, you'll be able to implement push notifications in your app in no time. Happy coding!